Tuesday 10 March 2009

Crafting for the Baby

A few things I've been sewing and knitting up for my Bellyfruit.

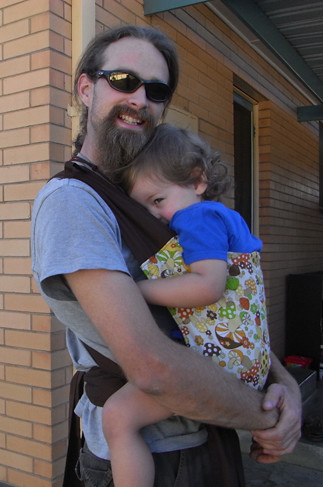
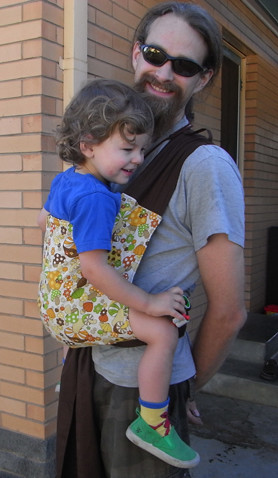
A mei tai made with this pattern and some delicious Japanese mushroom fabric. It also has a hood/headrest which I'm going to adapt to be removable via snaps, but I'm not putting that on just yet.

This was made for the baby to be carried in, but I asked DH and Elliot to test it for me and they're hooked!


I knitted a little outfit for the Bellyfruit too.


The top is adapted from a cardigan pattern, and the longies are Sheepy Pants. The wool is NZ Treliske Organic Merino 8ply. I dyed some up under the tuition of a friend, and used some undyed wool for contrast.

Tuesday 3 February 2009

Creative Holidays

Turns out that the only 'net access in Fiji would have required Em to hitch a lift in a boat out in the middle of nowhere, so I was safe. She wasn't *that* desperate for her emails.

Here are a few quick pics of things I’ve been up to over the holidays. Except for moving house. I don’t have pics of that, but it certainly took up most of my time and energy.

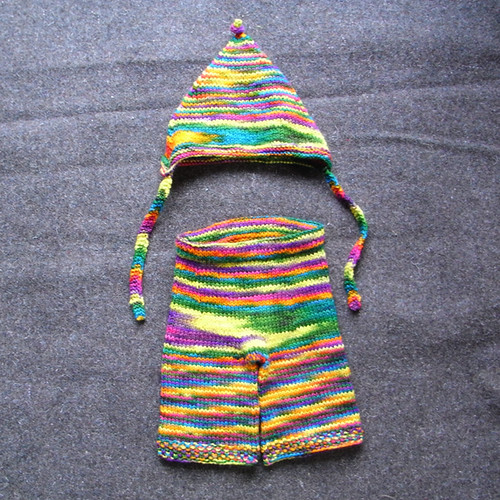
I knit these Shannon's longies up (blogged a few posts below this one) still had wool left over so I made the hat to go with them. I made up the pattern inspired by a few I've seen, and I added an i-cord knot at the top. Now I still have 25 grams of this wool left so I’m wondering if I have enough for some little baby mittens.

A perfect set for the Bellyfruit for winter.

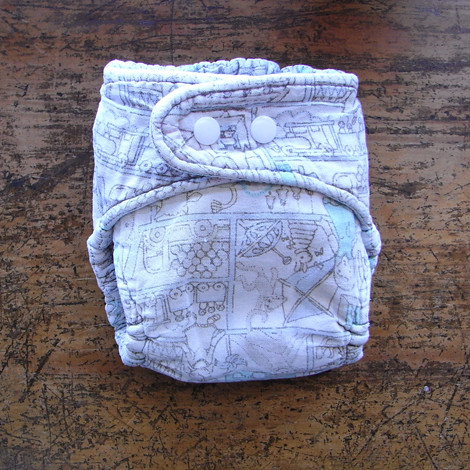
Amongst my New Year spending (post Consumtion Challenge I did have a few things I had been hanging out for) was a *snap press*. And my first snapping project was this tiny little nappy for the Bellyfruit. If you’ve read this blog before you’ll recognise the outer fabric. I’m still not finished with the first bedsheet after all these floral projects. The inner is apple green cotton velour and there is a hidden layer of bamboo fleece. I will be making a bamboo and velour booster to snap in, too.

Don’t you love the sheepish model?

I also removed the velcro and added snaps to my first self-designed nappy which I had made for Elliot almost one year ago.

I like this nappy even more now, and it still fits Elliot perfectly.

One last creative thing to show off today.

I have gone in on a swap on Rav where you’re assigned 4 swap partners whom you send a small parcel to on their birthday, and you receive 4 gifts on your birthday. I am enjoying thinking of things to send my swappers, and I’m looking forward to receiving crafty type gifts (for a change). My first swapper’s birthday was last week, and part of my parcel was these ridiculously extravagent Swarovski crystal stitch markers.


Mmmm, yum! Fortunately I bought enough beads to make myself a set. They caught the light so beautifully. I am sure they will be well loved and used in their new home.

We are happily settled into our new home now, in regional Victoria, and really enjoying the change of pace.

Thursday 1 January 2009

Reusable Coffee Bags for One

I'm going to take a risk and assume that Em is off partying in Fiji with no internet access. Hopefully, if she does have net access there, she will have better things to do than to check this blog.

Before she left to go galavanting across the Pacific Islands yet again, she asked me to make these for her.


They are coffee bags. You put your scoop of coffee (real stuff, ground beans) in them and use them like a tea bag. The coffee steeps, or brews, or whatever you call it, and then you pull out the bag, give it a rinse, and drink your coffee.

Em saw this idea overseas in her vast travels, and decided this would be a great solution for all those times when she is stuck with little more for company than a good book and a breathtaking view of the beach and the ocean in some tropical paradise.

If you'd like to try this idea yourself, I used 6.5" squares of a muslin/cheesecloth type fabric (supplied by Em, so I'm not sure what it is).
- I overlocked the edges all around.
- Then I sewed down a small hem on one edge to encase the cord later.
- Then I folded the square in half and sewed from the stitch line I just made down and across the bottom edge.
* The pic below explains the sewing. The green line is the hem for the cord (obviously done while the square is opened out), and the red line is to sew the square into a rectangular bag.
- I then threaded a length of cotton string through the hem at the top, and delivered them to Em's house for her to discover when she arrives home this coming week.


I left the bags with the seams facing out so that the little bits of coffee won't get stuck everywhere. Hopefully they will be easier to rinse this way, but they can just as easily be turned inside out if desired.

I plan to try this for myself if I find some brilliant herbal tea in leaf form.